In the world of car audio customization, few names resonate quite like Radio Shack. While no longer a brick-and-mortar presence, the legacy of Radio Shack car audio installation lives on. This guide will delve into the intricacies of car audio installation, drawing upon the principles that made Radio Shack a household name, and offering insights relevant to modern car audio enthusiasts.
Understanding the Basics of Car Audio Installation
Before diving into the specifics, it’s crucial to grasp the fundamental components of a car audio system. These include:
- Head Unit: This is the heart of your system, often referred to as the car stereo or receiver.
- Speakers: Responsible for converting electrical signals into audible sound.
- Amplifier (Optional): Boosts the signal from the head unit to power the speakers more effectively, especially for those seeking louder and clearer audio.
- Subwoofer (Optional): Designed to handle low-frequency sounds, adding depth and richness to your music.
- Wiring: Acts as the nervous system, transmitting signals and power between components.
Planning Your Car Audio Installation
A successful installation begins with careful planning. Consider these factors:
- Budget: Determine how much you’re willing to spend on components and labor.
- Sound Goals: Are you aiming for a subtle upgrade or a competition-worthy system?
- Vehicle Compatibility: Research what fits your specific car model to avoid compatibility issues.
Essential Tools for Car Audio Installation
Having the right tools is crucial for a smooth installation process. Here’s a list of essential items:
- Screwdrivers (Phillips and Flathead): For removing panels and securing components.
- Socket Wrench Set: To handle various bolt sizes.
- Wire Strippers/Crimpers: Essential for making clean and secure wire connections.
- Electrical Tape: For insulating exposed wires and connections.
- Panel Removal Tools: Prevent damage to your car’s interior trim during disassembly.
- Multimeter: For testing electrical circuits and connections.
Radio Shack’s Legacy: Quality Wiring Harnesses
Radio Shack was renowned for its selection of wiring harnesses, designed to simplify the installation process. While Radio Shack stores are no more, quality wiring harnesses remain vital. These pre-made bundles of wires, color-coded and fitted with connectors, ensure compatibility and eliminate the need for complex wire splicing.
For instance, if you’re looking to upgrade your car radio, a radio shack car radio installation guide might still offer valuable insights, even if you source your harness elsewhere. Always ensure you choose a harness specifically designed for your car make, model, and year.
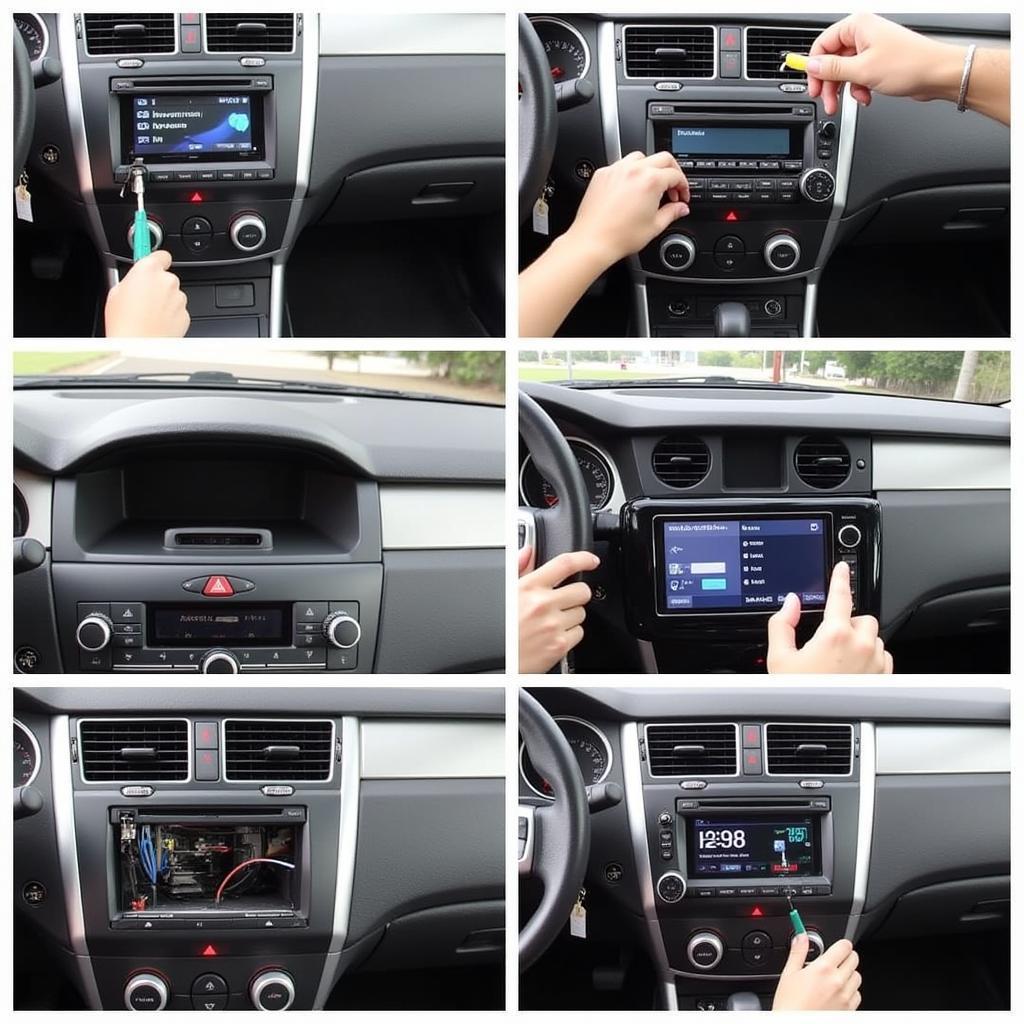
Installing Your Car Audio System: A Step-by-Step Guide
While specific steps vary depending on your car and chosen components, here’s a general overview:
- Disconnect the Battery: Safety first! Disconnect the negative terminal of your car battery to prevent electrical shorts.
- Remove Factory Components: Carefully remove existing panels, trim, and the factory radio or speakers using appropriate tools.
- Install the Head Unit: Connect the wiring harness to the new head unit and secure it in the dash.
- Connect the Speakers: Run speaker wires from the head unit (or amplifier if used) to the speaker locations and secure them.
- Install the Amplifier (Optional): Mount the amplifier securely and connect it to the head unit, speakers, and power source.
- Ground Connections: Ensure all components have proper ground connections to the vehicle chassis.
- Test the System: Before reassembling everything, reconnect the battery and test the system thoroughly for functionality.
- Reassemble and Enjoy: Once satisfied, carefully reassemble all panels and trim.
Troubleshooting Common Car Audio Problems
Even with meticulous planning, issues can arise. Here are some common problems and potential solutions:
- No Sound: Check speaker connections, fuse(s), and head unit settings.
- Distorted Sound: Ensure speakers are wired correctly (positive to positive, negative to negative), lower the volume, or check for damaged components.
- Alternator Whine: This indicates a grounding issue. Double-check all ground connections.
Modern Advancements: Bluetooth Mics and Beyond
Today’s car audio landscape extends far beyond traditional setups. Bluetooth microphones, for example, have become essential for hands-free calling and audio streaming. Installing a bluetooth mic for car radio can significantly enhance convenience and safety.
Furthermore, car integration with smartphones has opened up a world of possibilities, from navigation apps to personalized music streaming services. Many modern head units offer features like Apple CarPlay and Android Auto, seamlessly integrating your phone’s capabilities with your car’s audio system.
Conclusion
While Radio Shack may be gone, its influence on car audio installation endures. By understanding the basic principles, investing in quality components, and approaching the process with patience and attention to detail, you can achieve a car audio setup that delivers an exceptional listening experience. Remember, online resources like those found on radio shack car stereo wiring harness can still provide valuable information. So, embrace the DIY spirit and enjoy the journey of customizing your car’s sound system!